Chris Padilla/Blog
My passion project! Posts spanning music, art, software, books, and more. Equal parts journal, sketchbook, mixtape, dev diary, and commonplace book.
- Traces: Path of a request through your app. Think multiple lambda functions. Broken up into individual spans
- Metrics: Measurement captured at runtime. Anything you'd like to quantify.
- Logs: What you emit from your logger. Can be tied to a trace.
- Instrumented App: Your code wrapped in an SDK to create traces, metrics, and logs.
- Exporter: Responsible for sending your data to the collector. Can exist within your application.
- Collector: Can receive and send Open Telemetry data. This is where you will point your application to.
- Back End: Your vendor or self hosted solution specific service for storing and rendering your data.
- A succinct way to export the state.
- A way to load the state from the db and re-instantiate my
ProcessStateclass - Setting Up a MongoDB database to store subscriptions
- Writing my Schema for the above.
- Importing Pete's mailer.js file for formatting and sending email templates
- Integrating the API endpoint in my Next.js app under
/pages/api/subscribe.js
Application Monitoring with Open Telemetry
I've been spending time diving into instrumenting our serverless apps with Open Telemetry.
The situation: We've previously used a custom logging solution to monitor a few cron jobs. It's worked well for a time. As we scale, though, we've started looking for another solution.
An issue with most off-the-shelf monitoring services is the amount of vendor lock in you set yourself up for. Thus, the Open Telemetry protocol came about.
The gist is that it's a standardized way your application can emit:
These data points are then sent from the application to a collector that can send these to your backend of choice. Many vendors have supporting libraries, including big players like Data Dog and New Relic.
Concepts
There are a few concepts to understand before getting started. You'll likely be setting up several services to instrument your application.
The pieces are:
Instrumenting The App
The fastest way to get started is with a zero code instrumentation. There are slick ways for the Open Telemetry (OTel) SDK's to integrate with a web server like Flask.
For an application without a framework, though, there's a bit of manual work to do:
The official OTel docs outline the packages to import. You'll have to choose between gRPC or http protocol as your means of exporting. (Though, it seems the gRPC implementation is mostly a dressed up HTTPS protocol.)
Once you have it setup, emitting traces is straightforward:
with tracer.start_as_current_span(fn.__name__, links=links) as span:
    span.add_event(f"{fn.__name__}() started")

    # Do work

    span.add_event(f"{fn.__name__}() complete")
    return result
Setting Up the Collector
You could point your OTel config directly to your backend. Much of the benefit, though comes from using this in a distributed system. Here, a dedicated collector comes in handy.
If you're in an AWS environment, you can take advantage of the AWS Open Telemetry Collector. Setup here is primarily a bit of configuration.
My OTel project is still a work in progress, so that's all for now! I'll leave the nitty gritty for another post.
Raymond Hubbell – Poor Butterfly
🦋 Adding color with those chord extensions!
Jellyfish

Mathieu on Learning Pace
From "The Listening Book" by W.A. Mathieu. Full title of the essay says it all: There's Not Much to Learn and It Takes Forever
The truth is, a musician can spend a lifetime learning five notes and still not know everything in them. The more masterful you become, the deeper becomes the mystery and the more you are a beginner.
So when a student feels sluggish in learning a certain mode or cross rhythm, I have to say how there is hardly anything there to learn but that it takes more than one life.
... there is no ought-to-know-how, there is only the uncovering of ourselves when we sit at the polishing stone.
It was in my Masters, after 15 years of playing, that I started to think I was getting the hang of things. Only to find out 5 years later that there's much, much more to learn.
Copy and paste to your discipline of choice.
Passing State in Python with the Special Dictionary Attribute & the Classmethod decorator
I found myself in a situation where I had constructed a ProcessState class for storing the results of a cron job that runs on AWS. Passing the instance of ProcessState works just fine when it all happens in a single package. But then I needed to store the state in our database temporarily while the lambda kicks over to another procedure within a step function.
I needed two things:
Two built-in Python methods did the trick: the __dict__ Special Attribute and the @classmethod decorator.
Starting File
Here's ProcessState:
import logging
from logging import Logger
import datetime
from .types.unit_dict import UnitDict


class ProcessState:
    """
    Object for storing and formatting Process State
    """

    def __init__(
        self,
        result: list[UnitDict] = [],
        complete: bool = False,
        errors: list[str] = [],
    ):
        self.result = result
        self.complete = complete
        self.errors = errors
        self.logger = logging.getLogger("ProcessLogger")

    def __repr__(self):
        return f"ProcessState('{self.result}', {self.complete}, {self.errors}"

    # Methods for updating and formatting date here.
From the type hints, you'll see that we're dealing here with properties of basic types: lists and a boolean. I've also instantiated the class with a logger.
Exporting with the Dict Attribute
If I want to get all of those properties, I can simply call the __dict__ attribute directly:
ps = ProcessState()

# Update the state here.

# Get the dictionary
dict = ps.__dict__
If I'm only storing values I want to pass along, this works great!
The wrinkle comes with the logger. I'm not interested in passing that along outside of my application. But the result will include reference to the logger.
So I'll have to handle filtering it out with a few helper functions:
class ProcessState:
    """
    Object for storing and formatting Process State
    """

    ...

    def get_dict_from_state(self):
        result = {k: v for k, v in self.__dict__.items() if self._is_value_property(v)}
        result["created_at"] = datetime.datetime.now().isoformat()

        return result

    def _is_value_property(self, v):
        if isinstance(v, Logger):
            return False
        return True
I've also gone ahead and added a "created_at" property.
Now, calling ps.get_dict_from_state() would provide only the errors, complete state, and result. Excellent!
Loading a Dictionary Into Our Class
Say I pass the result off to my DB. I then query the db for those values again.
Looking at my __init__ method above, I could almost get away with passing in the dictionary as-is with a spread operator like so:
ps = ProcessState(**dict)However, my dict now includes a created_at property which I haven't included in the __init__ function!
If it were important to persist that field, I could add it to my init function. Or I could make use of an extra **kwargs at then end of my init signiture to catch any arguements not already defined.
BUT say that I also need to do some data massaging, such as instantiating another class within ProcessStates own initialization?
@classmethod is the answer.
I'll show how I'm using it, then how to construct it:
ps = ProcessState.from_dict(dict)very similar to calling the __init__ method, though we're not tied to one signature. In fact, we could have multiple @classmethods for different scenarios, lending more flexibility to our instance construction.
The simplest way to implement thiswould be to pass everything in:
class ProcessState:
    """
    Object for storing and formatting Process State
    """

    . . .

    @classmethod
    def from_dict(cls, values: dict) -> "CollectionState":
        return cls(**values)
However, as I mentioned, we have an unwanted attribute. Here I'll filter it out with list comprehension:
    @classmethod
    def from_dict(cls, values: dict) -> "CollectionState":
        filtered values = [x for x in values if x in ["errors", "results", "complete"]]
        return cls(**values)
With that, we're back up and running, ready to use ProcessState in our function!
Carl Fischer – We'll Be Together Again
No tears, no fears. Remember, there's always tomorrow... ~
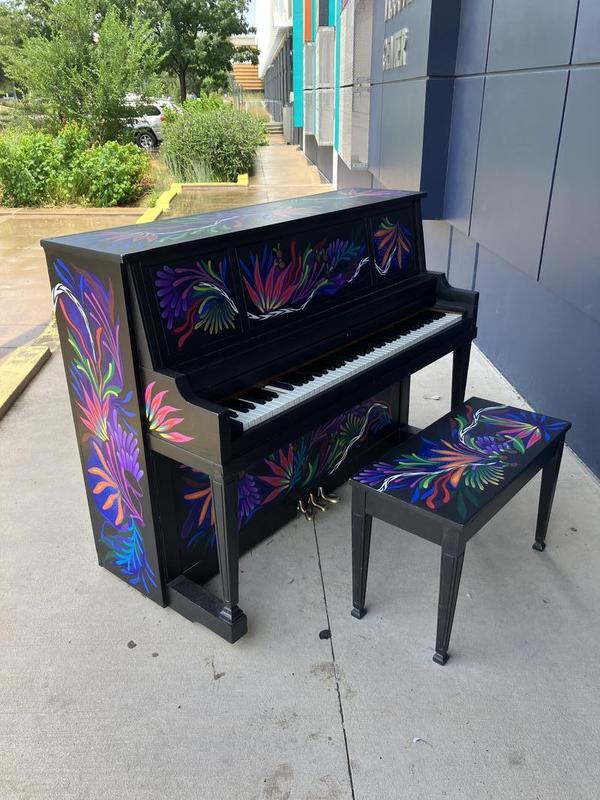
Had the pleasure of playing this beautiful piano just outside of the Frisco Discovery Center:

Day Dreaming Pup

Love painting this pup. Lucy is becoming my muse! 🐕
Brian Eno on Music and Painting
Sourced from Austin Kleon in his newsletter this week, Brian Eno's 2011 Moscow lecture.
Eno talks on how music (especially classical music) was a performative, hierarchy driven medium. Recorded music, however, takes out that hierarchy and makes the act of creating music more like painting. Really beautiful ideas, the whole thing is worth a listen.
Type Hinting in Python
After spending some time in Java, TypeScript, and C#, I've started to miss typing when it's not there.
While Python won't keep from compiling if there's a type issue, the autocomplete and clarity that comes with Type Hinting is a boon to productivity and clarity.
The Basics
A quick, simple example:
def say_name(name: str) -> str:
    return "My name is " + name
name: str is declaring that name is the built-in string type. The -> str denotes that we are returning a string.
Not Fool-Proof
Say that there are some conditions to the function:
def say_name_if_starts_with_j(name: str) -> str:
    if name[0] is 'J':
        return "My name is " + name
    else:
        return False
I've said this method will return a string, but in some cases it returns a boolean. In statically typed languages, this would raise an error at compile time, and/or my editor may alert me to the issue. In Python, however, these are only hints. So this code flies.
Let's fix it before moving on:
from typing import Union

def say_name_if_starts_with_j(name: str) -> Union[str, bool]:
    if name[0] is 'J':
        return "My name is " + name
    else:
        return False
Why It's Called Type Hinting
The main benefit here comes later as I'm calling the function. Say I'm in the middle of writing this code:
name = say_name_if_starts_with_j("Jake The Dog")
name.capitalize()
# autocomplete suggests string methods, such as "capitalize"
Because we've gone through the trouble of typing our return value, my code editor knows to suggest string methods (as well as boolean methods!)
Hovering over the say_name_if_starts_with_j method now also includes a line recreating my defenition:
(method) def say_name_if_starts_with_j(
    name: str
) -> str
We're missing some of the compiling and linting benefits of statically typed languages out of the box with Type Hinting. However, it's a feature of the language that still has value in communication!
Typing here allows for me to be intentional with my methods and allows for an opportunity to communicate clearly the expected inputs and outputs of my function. One less trip to another tab in my code editor or browser can go a long way for keeping the flow going.
Foolin' With Funk
Groovin' on a Sunday mornin'
Sunset Over Campion Trail Creek
Our favorite time to walk the trail 🌅
Raspberry Snow Cone
Recording a new album! Bit of a rock ballad vibe
Vintage Computer Festival Southwest!
I recently attended Vintage Computer Festival Southwest. It's a great, no frills celebration of the history and preservation of personal computing. Everything from Atari machines to the single body iMac G3's were present!
We're pretty spoiled with technological advancement and availability over here in the US of A. It's easy to forget how phenomenal what we have is.
If you haven't fooled with a classic computer in a few decaeds — it's an interesting cocktail of experiences! One part nostalgic, a dash of disorientation (how does this work again?), sometimes impressive for the time, and other times quaint.
One thing that was consistent across the folks I chatted with: Everyone had a story where their eyes brightened, the conversation got spirited, and they could tap into an early memory of being enamored with what was possible with a machine. Be it putting a PC together, playing games, or programming.
If you're really open to taking a step into your own early memories with these machines, there's a unique opportunity. It's a chance to connect with the spirit of why technology matters beyond its pragmatic function: to inspire awe and wonder.
(If you're looking for a quick taste, I'd recommend LGR on YouTube. I could watch this man repair 90s PCs for days on end.)
Dreamy Fields

My favorite thing about learning to paint is how sunsets are now even more beautiful to look at. 🌅 🐑
Sending Email From a Next.JS App
My favorite spot to catch up with writers and artists is from the comfort of my own email inbox. Social media algorithms are fickle and too bite-sized to be sustaining. But sitting down for a couple of minutes to read an email long form is a delight!
I was curious about implementing the infrastructure for this very site. I don't plan on going full-on email marketer! I am interested, though, in a once or twice a year short note on what's going on in my corner of the internet.
And, the fun part — It means getting to write some node code to set up an email subscription flow!
API
My implementation started as a fork of Pete Houston's Simple Newsletter repo on GitHub. If you want to get started quickly with a project like this, I'd highly recommend taking a look there!
I'll breeze through, doing a few steps "off-camera first":
This setup is fairly similar to my DIY Analytics put in place for a separate React project.
Writing /pages/api/subscribe.js will expose my endpoint at chrisdpadilla.com/api/subscribe. A POST request there will submit data to save the user subscription and send a welcome email.
Client Flow
Writing the client flow is just good-ol' React. I'll be using state, submitting a form, and handling the results.
On my subscribe.js page, I'll start by setting up state for form fields:
export default function Subscribe() {
  const [firstName, setFirstName] = useState('');
  const [lastName, setLastName] = useState('');
  const [email, setEmail] = useState('');
  const [frequency, setFrequency] = useState('ALL');
  const [submitting, setSubmitting] = useState(false);
  const [error, setError] = useState(false);
  const router = useRouter();

  ...

}
I'm also bringing in the useRouter hook to later forward the user to a success page on completion.
Next, we'll render the form:
return (
    <Layout>
      <Head>
        <title>Newsletter | Chris Padilla</title>
      </Head>
      <Header />
      <Container>
        <h1>Email Newsletter</h1>
        <p>A quiet set of updates — just a couple a year — on what I'm up to. Unsubscribe anytime.</p>
        <p>Looing to update your subscription? <Link href={`/update-sub`}>Click here</Link>.</p>
                <form onSubmit={onSubmit}>
          <label htmlFor="firstName">First name:</label><br />
          <input type="text" id="firstName" name="firstName" required value={firstName} onChange={e => setFirstName(e.currentTarget.value)} /><br />
          <label htmlFor="lastName">Last name:</label><br />
          <input type="text" id="lastName" name="lastName" required value={lastName} onChange={e => setLastName(e.currentTarget.value)} /><br />
          <label htmlFor="email">Email:</label><br />
          <input type="email" id="email" name="email" required value={email} onChange={e => setEmail(e.currentTarget.value)} /><br />

          <button type="submit" disabled={submitting}>{submitting ? 'Submitting...' : 'Sign Me Up!'}</button>
          {error && (
            <p>Oops! Something went wrong... try refreshing. If all else fails,  <Link href={`/contact`}>
            <a>reach out to me directly.</a>
          </Link>.</p>
          )}
                </form>
      </Container>
    </Layout>
  );
Next I'll handle radio elements for emailing frequency. Most input fields are simple enough with one element. Radio elements, however, require special logic to work. Here, I'm setting the value to true only if our state matches the current element. The onChange is then responsible for updating the state to its value.
<fieldset value={frequency}>
  <legend>How often would you like to receive emails?</legend>
    <input type="radio" id="contactChoice1" name="frequency" value="ALL" checked={frequency === 'ALL'} onChange={e => setFrequency("ALL")}/>
    <label htmlFor="contactChoice1">Sometimes (a few times a year)</label>

    <input type="radio" id="contactChoice2" name="frequency" value="SOME" checked={frequency === 'SOME'} onChange={e => setFrequency("SOME")}/>
    <label htmlFor="contactChoice2">Rarely (once a year)</label>

    <input type="radio" id="contactChoice3" name="frequency" value="UNSUBSCRIBE" checked={frequency === 'UNSUBSCRIBE'} onChange={e => setFrequency("UNSUBSCRIBE")}/>
    <label htmlFor="contactChoice3">None</label>
  </fieldset><br />
Now for submitting the form! My submit handler will set the submitting state so the input button won't accidentally be double-clicked.
Then, I'll gather the values from state. From there, the fetch API is used to send the request. And upon successful submission, the user is then redirected to /subscribed?n={firstName}. The query param is added to customize the message when they land.
That's all there is to it! There's more work involved with handling updating subscription status and using the templates. If your curious, I'd recommend digging into Pete Houston's Simple Newsletter repo and playing with it yourself!